
Today we will be making a futuristic attendance system that identifies people from their faces and automatically marks their presence. It will also allow us to detect any intruders. This face recognition technology is a form of non-intrusive biometric system and is used in many key-less entry systems in stores, offices and other places.
How it works
Face recognition used to be rocket science in the pre-2012 days. But now, thanks to the explosion in Deep Learning due to rapid advancements in GPU compute capabilities, the technology has become quite accessible. There are many free and paid services that provide pre-trained neural networks for the purpose of face recognition and analysis. You only need to have basic programming skills in order to use their API. We are going to use one such free API called Deepsight Face for our tutorial today.
Face Recognition using Deepsight Face
Deepsight Face consists of a deep convolutional neural network that was trained on a million human faces in order to distinguish them. It does so by calculating a 128-dimensional numerical vector from the pixels of the human face. The nature of this vector is such that all images of the same face will have vectors lying closer to each other. Whereas vectors of different faces will lie far apart. If A and B were two different persons, all their vectors will appear as follows. (This is a simple 2 dimensional representation, actual vector is 128 dimensional!)
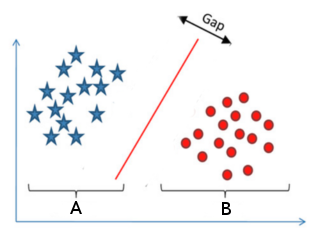
The closeness is calculated using the geometric euclidean distance or L2 norm of the vectors.
Enough talk, let’s begin
Install Deepsight Face
If you haven’t already, then the first step would be to install Deepsight. The documentation covers this topic quite well, so, it is highly recommended that you follow that. After you have launched Deepsight and it starts running you can follow the next section.
Implementing the attendance system
- Install Python and dependencies. Follow this in the documentation.
- Install OpenCV along with python wrappers. Follow the guides for Windows and Linux.
- Install numpy using
pip install numpy - Install requests using
pip install requests - Create a file attendance.py and start coding as follows
The Code
First, import the necessary dependencies.
[python]
import cv2
import requests
import numpy as np
import json
import argparse
import signal
import logging
import datetime, time
[/python]
Deepsight Face runs as an http service on localhost. Hence, we need to define the API endpoints.
[python]
face_api = "http://localhost:5000/inferImage?returnFaceId=true"
compare_api = "http://localhost:5000/compareFaces"
[/python]
Since this program will be a little sophisticated, we would like to log a few things. Hence, we need to initialise the logs.
[python]
# init logger
logger = logging.getLogger(‘Attendance’)
logger.setLevel(logging.DEBUG)
# create console handler with a higher log level
ch = logging.StreamHandler()
ch.setLevel(logging.DEBUG)
# create formatter and add it to the handlers
formatter = logging.Formatter(‘%(asctime)s – %(name)s – %(levelname)s – %(message)s’)
ch.setFormatter(formatter)
# add the handlers to the logger
logger.addHandler(ch)
[/python]
Next, initialise the attendance register and attendance database. The database is a simple python dictionary that contains a name and its associated face vector. Also, the attendance register is a python list that consists of attendance log. Each attendance log is a python dict with name and timestamp.
[python]
# attendance register
att_reg = []
try:
att_reg = json.loads(open(‘att_log’).read())
except:
pass
# initialize database
db = {}
try:
db = json.loads(open(‘att_db’).read())
except:
pass
[/python]
We then need to define some arguments that our program will be taking such as capture frame size and run mode. Our program will have two modes: Enrollment and Normal. In enrollment mode, our program will prompt the user to enter names of any newly detected face. In normal mode, the program will ignore unknown faces and log names that are known to the register.
[python]
# parse arguments
parser = argparse.ArgumentParser(description=’Awesome Attendance System’)
parser.add_argument(‘–enroll’, action=’store_true’, help=’Enable enrollment of unknown faces’)
parser.add_argument(‘–src’, action=’store’, default=0, nargs=’?’, help=’Set video source; default is usb webcam’)
parser.add_argument(‘–w’, action=’store’, default=320, nargs=’?’, help=’Set video width’)
parser.add_argument(‘–h’, action=’store’, default=240, nargs=’?’, help=’Set video height’)
args = parser.parse_args()
[/python]
Let’s begin by capturing from the webcam.
[python]
# start the camera
cap = cv2.VideoCapture(args.src)
cap.set(cv2.CAP_PROP_FRAME_WIDTH, args.w)
cap.set(cv2.CAP_PROP_FRAME_HEIGHT, args.h)
ret, frame = cap.read()
[/python]
We need to define a routine to catch any interrupt and save the attendance before exit
[python]
# catch exit signal
def signal_handler(signal, frame):
if args.enroll:
logger.info("Saving Attendance DB")
with open(‘att_db’,’w’) as att:
att.write(json.dumps(db,2))
logger.info("Saving attendance")
with open(‘att_log’,’w’) as att:
att.write(json.dumps(att_reg))
exit(0)
signal.signal(signal.SIGINT, signal_handler)
[/python]
Next, we define some functions that do the attendance management.
[python]
# enroll a new face into db
def enroll(embedding):
name = input("New face detected, enter name\n")
if name != "x":
db[name] = embedding
print("Enrolled %s into db!"%name)
# search for a face in the db
def identify_face(embedding):
for name, emb in db.items():
face_pair = {"faceA":emb, "faceB":embedding}
cmp_r = requests.post(compare_api, data=json.dumps(face_pair))
cmp_r = cmp_r.json()
logger.debug(cmp_r)
if cmp_r["same"]:
return name
return None
# last attendance
def mins_since_last_log():
return ((datetime.datetime.now() – datetime.datetime.strptime(att_reg[-1][‘time’], ‘%Y-%m-%d %H:%M:%S’)).seconds/60)
# mark attendance
def mark_present(name):
if len(att_reg) == 0:
logger.info("Detected %s"%name)
stime = datetime.datetime.fromtimestamp(time.time()).strftime(‘%Y-%m-%d %H:%M:%S’)
att = {‘name’:name,’time’:stime}
att_reg.append(att)
return
if att_reg[-1][‘name’] != name or mins_since_last_log() > 1:
logger.info("Detected %s"%name)
stime = datetime.datetime.fromtimestamp(time.time()).strftime(‘%Y-%m-%d %H:%M:%S’)
att = {‘name’:name,’time’:stime}
att_reg.append(att)
[/python]
Finally, we write code that actually implements our system.
[python]
<pre># start processing
while True:
_, framex = cap.read()
key = cv2.waitKey(50) & 0xFF
frame = cv2.resize(framex, (args.w,args.h))
r, imgbuf = cv2.imencode(".jpg", frame)
image = {‘pic’:bytearray(imgbuf)}
r = requests.post(face_api, files=image)
result = r.json()
if len(result) > 1:
faces = result[:-1]
diag = result[-1][‘diagnostics’]
for face in faces:
rect, embedding = [face[i] for i in [‘faceRectangle’,’faceEmbeddings’]]
x,y,w,h = [rect[i] for i in [‘left’, ‘top’, ‘width’, ‘height’]]
cv2.rectangle(frame, (x,y), (x+w,y+h), (0,255,0),1,8)
name = identify_face(embedding)
if not name is None:
cv2.putText(frame, name, (x,y+22), cv2.FONT_HERSHEY_SIMPLEX, 0.5, (0,0,255))
mark_present(name)
break
else:
if args.enroll:
enroll(embedding)
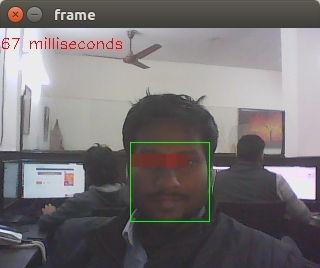
cv2.putText(frame, diag[‘elapsedTime’], (0,20), cv2.FONT_HERSHEY_SIMPLEX, 0.5, (0,0,255))
cv2.imshow("frame", frame)
if key == ord(‘q’):
break;
print("Exit")
[/python]
Usage
You will first need to perform enrollment so as to save some faces in the db. Launch the program with –enroll argument and start storing new faces as it prompts.
Type the person’s name and press enter. After enrolling sufficient number of people, you may stop the application with Ctrl+C.
Run it again without the enroll argument.
Congratulations on successfully creating your very own face recognition based attendance system. You can improve this system a bit. For instance, you may notice that we do simple pair-wise comparison of a detected face with the faces in the db. This brute-force method is very inefficient if there are more than a few 100 faces in the db. You can explore np.linalg.norm function and this stackoverflow question to perform the comparison of numpy vector with a matrix.