

Introduction
This is a step by step guide to help the Swarmsense users to set up their own website monitoring system using Swarmsense.
Before starting, let us understand the website monitoring. Websites are served by web-servers and are pointed by an IP-address and usually by a domain-name such as in these websites – “http://www.google.co.in” or “https://www.baseapp.com”, etc. It is of prime importance to web-site administrators to keep websites in running condition while it should be live and so they keep track of various factors indicating the health of web-servers and/or websites.
Website monitoring relies on the reply from the web-servers of these websites. The reply includes various information regarding current status of the website such as HTTP codes, headers, etc., apart from the main content. The reply-time also indicates performance of the websites. The goal of the website monitoring system is to keep the track of these things, notify users( if, necessary ) & add or remove or update the website urls to be monitored.
Make website monitoring system
I have used Swarmsense platform to create this system because it has features to add/edit/delete/update sensors, view sensor values, create kinds of sensors, manage network of sensors, notifying users if necessary, etc., all of which comes in handy to build our website monitoring system.
Get access to swarmsense
First step is to get access to the Swarmsense platform. I have added a reference ( Swarmsense official docs ) below to help you get the access. Also, you may want to go through the tutorial ( Swarmsense installation guide ) mentioned in the references, if you want to set-up your own server and run swarmsense on it.
Create the sensor-type
If you have a sensor-type (confirm with admin-user) that can serve your purpose for monitoring websites, you may skip this step. For purpose of this guide, I am going to keep track of the reply-time, http response code and the whole response content from the server. Following are the sub-steps to create the sensor of type with three fields – reply_time, response_code, response_content.
- After login (admin-user), go to ‘Admin’ -> ‘Manage Sensor Types’. And click on ‘CREATE’ to create a new type of sensor/device.
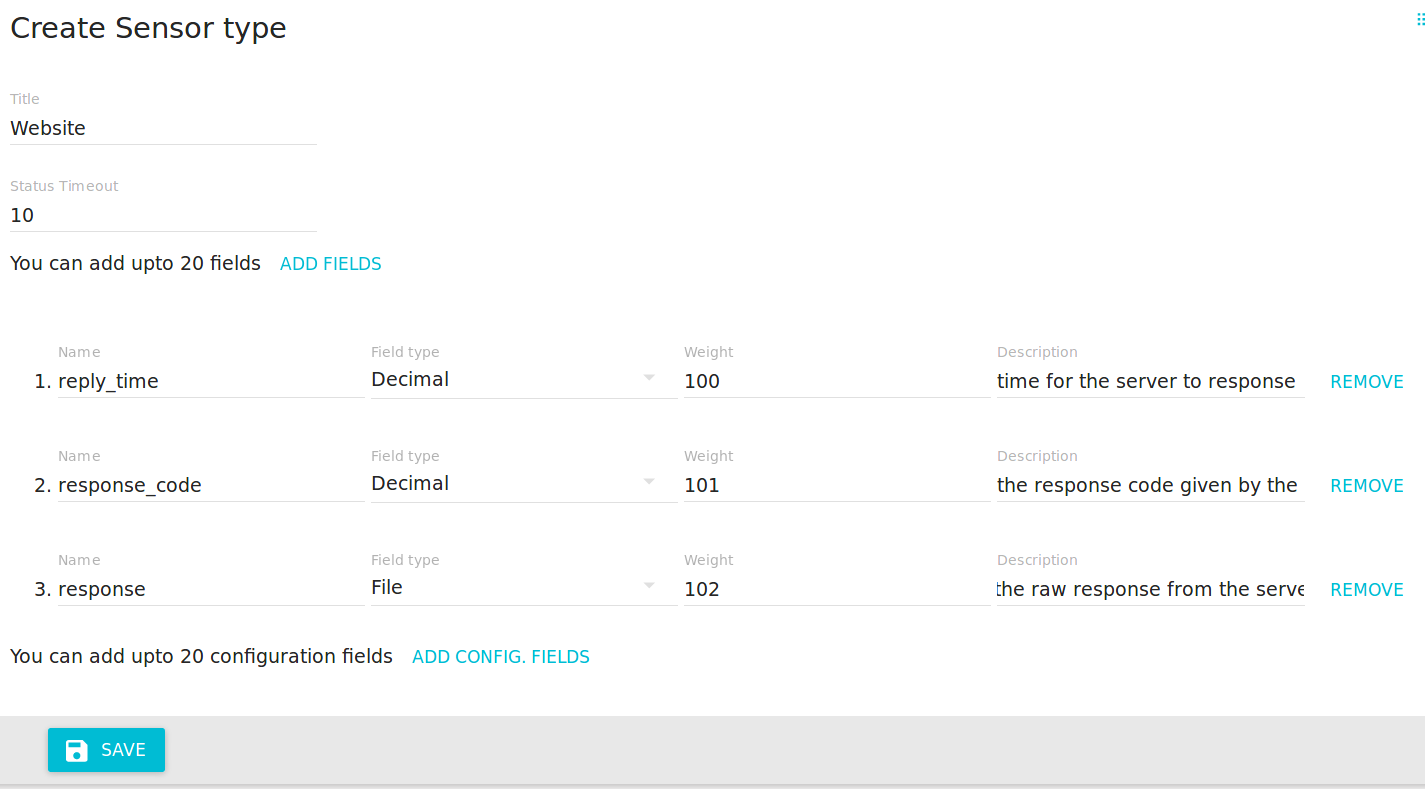
- Then, fill the form ‘Create sensor type’ to create the sensor. Fill in the title as ‘Website’ and status-timeout as ‘10’ and then click on ‘ADD FIELDS’, three times, so that we can make three fields.
- Then fill the fields according to ( following is an actual snapshot of sensor-creating form ) –

Create sensor type form – Website monitoring. - Then click on ‘SAVE’. After successfully doing this step, a new sensor-type titled as ‘Website’ is created and will be visible in the ‘Manage Sensor-types’ page. The image in the right is a snapshot of the form.
Add the websites
You may repeat following steps as many times as you want to add a new website to Swarmsense.
- To add the websites in the Swarmsense, you have to click on ‘Sensors’, in the menu on the left. This will bring you to the list of all the sensors currently associated to your account settings.
- To create a website-sensor, click on ‘CREATE’ and fill the ‘Create sensor’ form (provide name as the url of the website to be monitored, choose ‘website’ as the type of sensor, you may leave the longitude and latitude unattended for now).
- Click on ‘Save’ to add the sensor. After successfully submitting it, your sensor will be visible in the ‘Sensors’ page.
Create a monitoring script
This is a very important step, because here, we will create/use a script which shall monitor the websites added in the Swarmsense. I have used a very simple algorithm to create this monitoring script, which is open-source and available from github(link in the references). Feel free to use it, modify it or use your own. Code available here.
The basic algorithm, which I have used, is following –
- Wake up.
- Get all the sensors( websites ) from the Swarmsense, using the REST API( refer to the Swarmsense docs ). Refer to the function ‘sensors_source‘.[code]
/**
* A function to fetch websites list from the swarmsense.
* @func sensors_source
* @arg {func} callback A callback to handle the response.
*/
var sensors_source = (callback=null)=>{
let options = {
host:config.source_host,
port:config.source_port,
path:config.source_path(config.company_id),
method:config.source_method,
headers:{
‘Authorization’: `token ${config.ss_token}`,
‘Content-Type’: ‘application/json’
}
},
req = http.request(options, (res)=>{
let body = ”
res.on(‘data’, (chunk)=>{
body += chunk
})
res.on(‘end’, ()=>{
if(body){
try{
let json_response = JSON.parse(body)
logger(“Total sensors received: ” + json_response.total)
// console.log(json_response.data, json_response.total)
if(callback){
callback(json_response)
}
}
catch(e){
if(e.name === ‘SyntaxError’){
logger(“Parsing error in json received. ” + e.message )
}
else{
throw e;
}
}
}
else{
logger(‘No response from the server!’)
if(callback){
callback(null)
}
}
})
});
req.on(‘error’, (e)=>{
logger(‘Could not fetch the websites: ‘+ e.message) // log it.
});
req.end();
}
[/code] - Query each of the sensors using the sensor-name, one by one. Refer to the function ‘is_up‘ and ‘are_up‘.[code]
/**
* A function to check a live status of a url
* @func is_up
* @arg {String} url Url to check.
* @arg {func} callback A function to handle response.
**/
var is_up = (url, callback) => { //callback receives two argument – err, values.
if(!url.startsWith(‘http://’) && !url.startsWith(‘https://’)){
url = `http://${url}`
}
let module = http
if(url.startsWith(‘https://’)){
module = https
}
let req = module.get(url, (res)=>{
// logger(url)
let body = ”, time_it = 0 //in ms,
time_id = setInterval(()=>time_it+=1, 1), code=res.statusCode
res.on(‘data’, (chunk)=>{
body += chunk
})
res.on(‘end’, ()=>{
// logger(body)
time_id.close();
let values = {
url,
time:time_it,//ms
body,
code
}
callback(null, values)
})
})
req.on(‘error’, (err)=>callback(err))
req.end()
}
[/code][code]
/**
* Loads the websites and gets the status of the websites.
* @arg {are_up_callback} [callback] Callback that handles the response from querying the status.
**/
function are_up(callback=null){
if(websites && websites.data && websites.data.length >= 1){
websites.data.map(website=>{
// logger(`${website.name}`, “website name”)
is_up(`${website.name}`, (err, values)=>{
if(callback){
callback(err, values)
}
else{
config.debug = true
}
if(config.debug){
if(err){
logger(err)
}
else{
sensors_sink(website.id, values)
logger(`${values.url}(est. response-time: ${values.time} ms): ${values.code}`)
// logger(values.code)
}
}
})
})
}
else{
logger(“No websites yet!”)
}
}[/code]
- Read the response from the websites. Get the field-values(response_time, response, response_code), using the response. [Note: I’ve taken the reference of sensor-type created in the above step. You are free to describe your website-sensor as well as the fields while creating sensor-type]
- Send the field values for all the website-sensors to swarmsense, using the REST API. Refer to the function ‘sensors_sink‘.[code]
/**
* Function to submit the data to the remote server. Uses config information to post data.
* @func sensors_sink
* @arg {String} sensor_id The id of the sensor to provide to swarmsense REST API.
* @arg {Object} values The value to post to the swarmsense REST API.
* @arg {Number} values.code The response code while querying.
* @arg {Number} values.time The response time estimated in completing the query.
* @arg {String} values.body The response received from the server.
**/
sensors_sink = (sensor_id, values)=>{
let options = {
url:config.sink_host + ‘:’ + config.sink_port + config.sink_path(sensor_id),
// port:config.sink_port,
// path:config.sink_path(sensor_id),
method:config.sink_method,
formData:{
response_code:values.code,
reply_time:values.time,
response:{
value: Buffer.from(values.body),
options:{
filename: ‘response.html’,
contentType: ‘text/html’
}
}
},
headers:{
‘Authorization’: `token ${config.ss_token}`,
‘Content-Type’:’multipart/form-data’
}
}
request(options, (err, response, body)=>{
if(err){
logger(`Error occurred while posting. ${err}`)
}
else{
logger(`Success posting. Status-code: ${response.statusCode}`)
}
});
}
[/code] - Sleep. And after a specified time, repeat all the above steps.
Setup server with monitoring script and deploying it
Once you have created/downloaded the monitoring script/program, you may deploy it in many ways. It is important that the Swarmsense is reachable from the server, where the monitoring script will be running. You may have to change the server settings to make it reachable, if not already, by altering firewalls settings, etc.
This would be out of this article’s scope of ‘how to deploy a server over the INTERNET’. So, I’ll be focusing on my script, which you may find a good start before using your own( specifically, if you think what is all this going on! ).
- Install node on the server if not already installed. For more info refer – ‘NodeJS installation guide’ in references below. NPM will also be available on successful installation of the Node.
- Using the console run – ‘git clone https://github.com/astriskit/m-website-monitor.git’
- This shall make a folder named as ‘m-website-monitor’ in your current working directory.
- Go inside the folder using ‘cd m-website-monitor’.
- Then, write ‘npm install’ to install required packages.
- Edit the ‘config.js’ to set your ‘company_id’, ‘ss_token’(your login token)
- Then, write ‘node index.js’ to start the script.
- And it is deployed. For more information and options to use m-website-monitor, you can go here – ‘https://github.com/astriskit/m-website-monitor’.
Conclusion
After setting up everything as above, our monitoring script will keep sending proper information to the swarmsense, which in turn will keep track of the uptime/downtime of the website and hence, it would be possible for using the swarmsense at its fullest to monitor websites.
You may now use swarmsense for live monitoring of websites.
- Login to your account at your swarmsense website.
- Click on to ‘Sensors’ from the menu.
- Click on one of your website-name to see the history values.
Also, now you can make use of –
- Make groups of websites using network feature of swarmsense. For this go to “Networks” in the menu.
- Create alerts on individual website’s downtime using “Inactivity alert” or alerts in general. For this go to “Alerts” in the menu.
Below are a few references to keep you more interested.