
Introduction
This is a step by step guide to make custom widgets in the swarmsense platform. First, let’s understand some key terms, we will use all the time.
What is a dashboard ?
It is a place where information ( various fields’ values ) from many sources, ( which are usually various sensors or just one sensor ), can be wrapped up in widgets ( containers to show the information ).
How to make a dashboard ?
First step is to create a dashboard. It is alright, if you have one already made for you. All the dashboards can be found by clicking on “Dashboards” in the sidebar menu.
To create a new one, first click on “Dashboards”. Then, click “Create” on the right upper corner of the loaded page. Then, a dashboard-creating form will be loaded. Fill in the title of this dashboard and click ‘Save’.
After successfully creating a dashboard, this will take you to the list of dashboards, including the newer one which you have just created.
How to load a dashboard ?
Now, you have created a dashboard and want to see its content. To go to dashboard, first click on the ‘Dashboards’ from the side menu and then click the name of the dashboard you want to visit. This will load that dashboard.
What are Widgets ?
Widgets are containers made in a particular form ( such as text, graph, gauge, etc. ) to let user see and control in some cases ( such as in widget type ) the real time data of sensors.
When you load a freshly created dashboard for the first time, you will see a title bar and nothing else below it. In this page, you will add ‘widgets’ which show you a sensor’s field’s data in real time using available options such as graphs, gauge, etc.
How to create a widget ?
First load a dashboard where you want add the widget. Then, click on ‘Edit’ to make the dashboard editable. Then, ‘Create widget’ button will be visible in the title bar of the dashboard. To create a widget, just click on the ‘Create Widget’, which will lead you to fill a widget-creation form.
You have to fill in the title of the widget. Then, select type of the widget and then type the name of the sensor letter by letter to select a sensor. After that, select a proper parameter for which you are creating the widget. Then fill the unit of measurement for this parameter( if, any ).
After that, select the width ( in terms of percentages ) and then height ( in terms of pixels ) of the widget. Then fill in the order. The order value is used to sort the widgets in ascending/descending order. And then click on ‘Create widget’ to create a widget.
What are ‘custom-widgets’ ?
You may also choose to code your own widget apart from the available widget types. These widgets are defined as ‘custom widgets’ here. And this very guide will help you make them.
Steps to make ‘custom-widgets’
Since, we understand basic terms and know-hows of widgets and dashboards, let’s get into creating custom-widgets now.
Create custom widget
Get started to create a widget like indicated above. When selecting a widget type in the widget creation form, select ‘Custom’ for creating a custom widget. Now another form-field ( a text-area ) titled as ‘Custom widget’, will be visible as soon as you select ‘Custom’ widget type.
This field is where you will write your javascript code. This field makes the body of a function which must return a proper HTML markup string and which will be parsed while this custom-widget is rendered.
Writing javascript code for custom widget
This will require your JS skills. Hence, it is a technical part in the whole process.
Basically, we are implementing following function ( name ‘render_widget’ doesn’t matter ) while filling in body of function using the ‘Custom widget’ form field.
[code]
/**
* A function to render custom widget.
* @arg {string} sensor_name Name of the sensor selected while making widget.
* @arg {string} sensor_id The unique id of the sensor
* @arg {string} name The parameter name of the sensor selected at the time of the widget creation.
* @arg { string | undefined } unit The unit of measurement.
* @arg { Number } value Indicates the value of the parameter selected.
* @arg { string } time A date object indicating the time when sensor emitted the value.
* @returns {String} A string value which will be set as an element’s innerHTML property.
**/
function render_widget ( sensor_name, sensor_id, sensor_key, parameter, unit, value, time ) {
// function body of this widget.
}
[/code]
The function body is empty by default. And by filling in the ‘Custom Widget’ field, this function is completed. Please visit JSDoc for interpretation of various ‘@’ tags.
In essence, you use the passed arguments, process according to your wish in your code using javascript and return a html markup to show while the widget will be rendered.
As soon as a new data is available, this function will be executed again with new data and hence, you need not to bother about real-time updates and it will update on its own.
After filling the ‘Custom Widget’ field and other fields in creating widget form, click on ‘Create Widget’ to create your custom-widget. After successfully completing this step, your widget should be visible along with other widgets in the dashboard.
What again !?
And if you are asking this question, then I present to you the value for the ‘Custom Widget’ form-field for a simple custom widget that I had made –
[code]
return `
<div style=’color:white; background-color:grey;’>
${ value } ${ unit || ‘units’ } @ ${ time.toLocaleTimeString() }
</div>;
` ;
[/code]
And the output on the dashboard would be like the following screen-shot.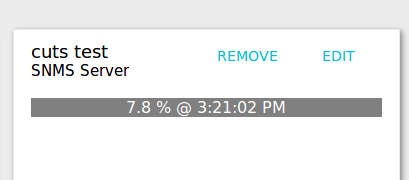
This given example is a very basic one. You may think of more complex ones ( ‘Only sky is the limit’ ).
Conclusion
In Swarmsense platform, while creating widgets for your sensors in dashboards, if you feel the available widget types are inadequate, you may always choose to create a widget type of your own, using the above guide.