
Intro
With face recognition technology becoming increasingly accessible, thanks to great strides made recently in machine learning and AI, the time is ripe to start developing solutions around this to quickly capitalise on this emerging market. Face analytics has become inevitable in many applications – from Social media to Security systems. Many estimates indicate a steady annual growth of 13% for net market worth of face recognition technologies which will reach at least 7.7 Billion USD by 2022 [ref].
If you have entered this market and are planning to develop a custom solution for your client, you might find reading our article comparing various existing face recognition SDKs and APIs beneficial. These can be integrated into your application and do the heavy lifting.
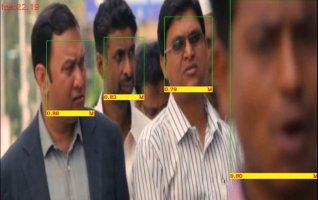
This article demonstrates using Deepsight SDK for the purpose of real time face detection and demographic analysis on surveillance videos. The video below demonstrates our objective. Deepsight installation is easy and only takes a couple of minutes.
How to
- First download and install Deepsight SDK by following the getting started guide.
- You will need OpenCV for the tutorial. Follow the guide here for Ubuntu or Windows to install it.
- Copy and paste the following python code in a new file
tutorial.py[python]
import cv2
import requests
import numpy as np
import json
import argparse
import signal
import logging
import datetime, time
import osface_api = "http://localhost:5000/inferImage?returnFaceAttributes=true"
compare_api = "http://localhost:5000/compareFaces"# parse arguments
parser = argparse.ArgumentParser(description=’Realtime Face Analytics’)
parser.add_argument(‘–src’, action=’store’, default=0, nargs=’?’, help=’Set video source; default is usb webcam’)
parser.add_argument(‘–w’, action=’store’, default=320, nargs=’?’, help=’Set video width’)
parser.add_argument(‘–h’, action=’store’, default=240, nargs=’?’, help=’Set video height’)
args = parser.parse_args()inp_w = int(args.w)
inp_h = int(args.h)# start the camera
cap = cv2.VideoCapture(args.src)
cap.set(cv2.CAP_PROP_FRAME_WIDTH, float(args.w))
cap.set(cv2.CAP_PROP_FRAME_HEIGHT, float(args.h))
ret, frame = cap.read()# To record video uncomment these lines
#fourcc = cv2.VideoWriter_fourcc(*’XVID’) # Define the codec and create VideoWriter object
#out = cv2.VideoWriter(os.path.basename(args.src)[:-4]+"_out.avi",fourcc, 25.0, (inp_w,inp_h))# catch exit signal
def signal_handler(signal, frame):
global cap
#out.release()
cap.release()
print("Exit")
exit(0)
signal.signal(signal.SIGINT, signal_handler)male_icon = cv2.imread("m.png", -1)
female_icon = cv2.imread("f.png", -1)# start processing
count = 0
while True:
_, framex = cap.read()
key = cv2.waitKey(1) & 0xFFcount +=1
# if count%3!=0:
# continueframe = cv2.resize(framex, (int(args.w),int(args.h)))
r, imgbuf = cv2.imencode(".bmp", frame)
image = {‘pic’:bytearray(imgbuf)}start_time = time.time()
r = requests.post(face_api, files=image, timeout=10)
result = r.json()
t = time.time() – start_time
print("—%0.3fs %0.3fFPS —" %(t, 1/t))if len(result) > 1:
faces = result[:-1]
diag = result[-1][‘diagnostics’]for face in faces:
#rect = [face[i] for i in [‘faceRectangle’]][0]
rect, gender, age = [face[i] for i in [‘faceRectangle’, ‘gender’, ‘age’]]
x,y,w,h, confidence = [rect[i] for i in [‘left’, ‘top’, ‘width’, ‘height’, ‘confidence’]]if confidence < 0.4:
continuecv2.rectangle(frame,(x,y),(x+w,y+h),(0,255,0),1,8)
cv2.rectangle(frame, (x,y-10), (x+w,y), (0,255,255), -1, 8)
cv2.rectangle(frame, (x,y+h-10), (x+w,y+h), (0,255,255), -1, 8)cv2.putText(frame,"%s"%(age), (x,y-2), cv2.FONT_HERSHEY_COMPLEX_SMALL, 0.5, (0,0,255),1)
cv2.putText(frame, "%0.2f" % (confidence), (x, y+h-2), cv2.FONT_HERSHEY_COMPLEX_SMALL, 0.5, (0, 0, 255),1)
cv2.putText(frame, "%s"%(gender[0]), (x+w-10,y+h-2), cv2.FONT_HERSHEY_COMPLEX_SMALL, 0.5, (0,0,255),1)cv2.putText(frame, "fps:%0.2f"%(1000/float(diag[‘elapsedTime’].split(" ")[0])), (0,20), cv2.FONT_HERSHEY_SIMPLEX, 0.5, (0,0,255))
# uncomment below to record to disk
#out.write(frame)
cv2.imshow("frame", frame)
if key == ord(‘q’):
break[/python]
- Install the dependencies
pip3 install requests - Run the program
python3 app.py --src /path/to/vid - You should be able to see the preview.
You can explore other arg params using the –help switch.
Conclusion
This tutorial demonstrates how Deepsight SDK makes developing face analytics applications extremely easy. It is possible to modify the tutorial code to improve upon the features.
Feel free to comment below for any queries.